Introduction to Cooling System Maintenance
How to efficiently maintain your car’s cooling system – A car’s cooling system is a vital component of its operation, ensuring the engine’s optimal temperature. Without a properly functioning cooling system, your engine risks overheating, leading to serious damage and costly repairs. Maintaining this system is crucial for extending the lifespan of your vehicle and preventing potentially expensive breakdowns.Neglecting cooling system maintenance can have significant consequences. Overheating can damage critical engine components like pistons, cylinder heads, and gaskets, leading to costly repairs or even engine failure.
Reduced engine performance and fuel efficiency are also common outcomes of an inadequately maintained cooling system. Moreover, overheating can cause a complete engine shutdown, leaving you stranded.
Components of a Typical Cooling System
The cooling system is a complex network of interconnected components working in harmony to regulate engine temperature. Understanding these components and their functions is essential for proper maintenance.
| Component | Description | Function |
|---|---|---|
| Radiator | A heat exchanger typically made of metal, often aluminum, with fins to increase surface area for heat dissipation. | The radiator absorbs heat from the coolant circulating through the engine and releases it to the surrounding air. |
| Water Pump | A centrifugal pump that circulates the coolant throughout the cooling system. | The water pump maintains the constant flow of coolant, ensuring proper heat transfer. A malfunctioning water pump will cause insufficient coolant flow, leading to overheating. |
| Thermostat | A temperature-sensitive valve that controls the flow of coolant to the engine. | The thermostat regulates the temperature of the engine by opening and closing, allowing coolant to flow through the engine only when the engine temperature reaches a specific threshold. |
| Coolant (antifreeze) | A mixture of water and antifreeze chemical. | Coolant protects the cooling system from freezing in cold weather and boiling over in hot weather. Proper coolant levels and composition are critical for the system’s effectiveness. |
| Hoses | Flexible tubes that carry coolant between various components of the cooling system. | These hoses transfer coolant between the radiator, water pump, thermostat, and other components. Leaks in hoses can lead to coolant loss and overheating. |
| Expansion Tank | A reservoir that allows for coolant expansion as it heats up. | The expansion tank compensates for the expansion of coolant without putting pressure on other components. |
Regular Maintenance Procedures
Keeping your car’s cooling system in top condition is crucial for its longevity and performance. Regular maintenance helps prevent costly repairs and ensures your vehicle runs smoothly, especially during extreme temperatures. Properly functioning cooling systems prevent overheating, which can lead to significant engine damage.A well-maintained cooling system safeguards your engine’s internal components, preventing damage and extending its lifespan.
Routine checks and tasks, while seemingly minor, are essential for overall vehicle health and safety.
Basic Cooling System Checkup
Regularly inspecting key components of your cooling system is essential for preventative maintenance. This involves checking fluid levels, inspecting hoses and belts, and evaluating the radiator cap.
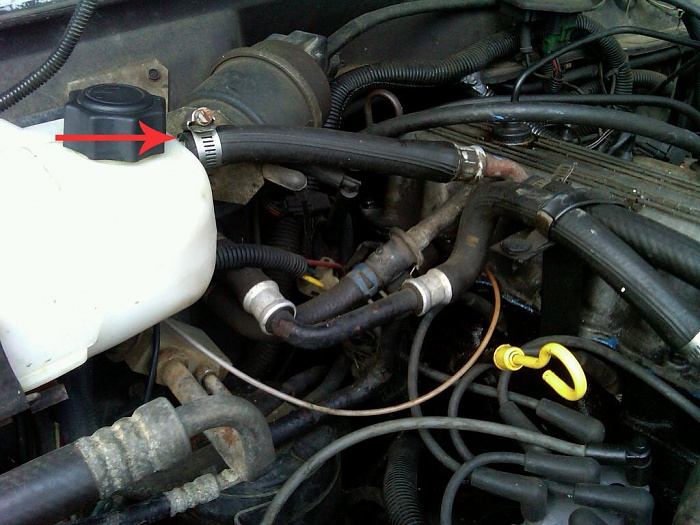
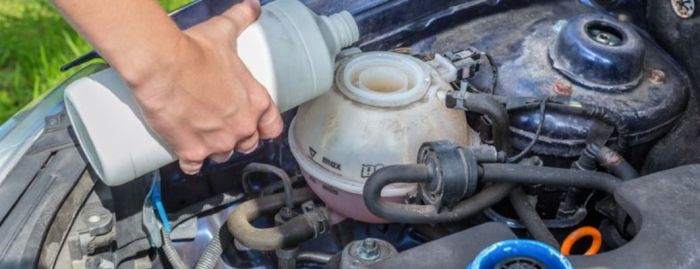
Coolant Level Check
Checking the coolant level is a fundamental part of maintaining a healthy cooling system. Locate the coolant reservoir, typically a clear plastic container, and check the fluid level against the markings. Ensure the level is within the specified range. Insufficient coolant can lead to overheating, while overfilling can cause pressure issues.
Hose and Belt Inspection
Inspecting hoses and belts is crucial for identifying potential leaks or damage. Visually examine all hoses for cracks, bulges, or any signs of deterioration. Feel the belts for cracks, hardening, or signs of fraying. Damaged hoses or belts can compromise the cooling system’s ability to circulate coolant effectively. Replace any damaged components promptly.
Coolant Change Procedure
Changing coolant is an important maintenance task that should be performed according to the manufacturer’s recommendations.
- Gather necessary tools and materials, including a new coolant solution, a funnel, and a drain pan. Ensure the vehicle is on a level surface.
- Locate the coolant reservoir and radiator drain plug. Open the reservoir cap to release pressure.
- Position the drain pan under the radiator drain plug. Open the drain plug and allow the old coolant to drain completely.
- Once the draining is complete, replace the drain plug securely.
- Slowly add the new coolant to the reservoir, filling it to the appropriate level. Follow the manufacturer’s recommendations for the correct type of coolant.
- Start the engine and allow it to run for a few minutes. Check the coolant level again and top off as needed.
- Check the cooling system for leaks after the engine has cooled down. Tighten any loose connections or replace damaged components.
Radiator Cap Inspection
Inspecting the radiator cap for leaks is a crucial step in maintaining the cooling system. Look for signs of leakage around the cap’s sealing area. A leaking cap can lead to reduced coolant pressure, potentially causing overheating. Replace the cap if leaks are present.
Monthly/Quarterly Maintenance Checklist, How to efficiently maintain your car’s cooling system
This table provides a suggested monthly/quarterly checklist for cooling system maintenance.
| Task | Frequency |
|---|---|
| Coolant level check | Monthly |
| Hose and belt inspection | Monthly |
| Radiator cap inspection | Quarterly |
| Coolant change | Annually or as recommended by manufacturer |
Coolant Type and Change Intervals
Source: cherokeeforum.com
Choosing the correct coolant and understanding its change intervals is crucial for maintaining a healthy cooling system. Proper coolant selection prevents corrosion, ensures optimal heat transfer, and extends the lifespan of your engine. Using the wrong coolant can lead to serious damage and costly repairs.Different coolant types offer varying levels of protection and performance. Selecting the right one for your vehicle is vital for long-term reliability.
Understanding the recommended change intervals is also important to maintain optimal system function. This section provides a comprehensive overview of coolant types and their corresponding change intervals, helping you maintain a well-functioning cooling system.
Coolant Types Available
Various coolant types are available, each with its own unique properties. The choice of coolant depends on several factors, including your vehicle’s make, model, and year. Understanding the characteristics of each type is essential for making the right decision.
- Organic Acid Technology (OAT) Coolants: These coolants utilize organic acids to inhibit corrosion. They are often formulated for extended drain intervals, offering superior protection against corrosion and scale formation compared to traditional silicate-based coolants. OAT coolants provide extended performance, requiring less frequent changes.
- Silicate-Based Coolants: Traditional silicate-based coolants are more commonly found in older vehicles. They provide adequate protection but have limitations compared to OAT coolants, requiring more frequent changes and may be less effective against corrosion in some cases.
- Hybrid Coolants: These coolants incorporate elements of both OAT and silicate-based technologies, providing a balance of performance and cost-effectiveness. They may be suitable for some vehicles, but the best choice often depends on the manufacturer’s specifications.
Identifying the Correct Coolant Type
Identifying the correct coolant type for your car model is vital. Incorrect coolant can cause severe damage to the cooling system. Referencing your vehicle’s owner’s manual is the most reliable source for the correct coolant type and change intervals. This document typically specifies the recommended coolant, including its chemical composition and required properties.
Coolant Change Intervals
Manufacturer guidelines provide recommended coolant change intervals. These intervals are based on various factors, including driving conditions, climate, and coolant type. Adhering to the manufacturer’s recommendations is crucial for optimal performance and longevity of your cooling system.
| Coolant Type | Typical Change Interval (in years/miles) | Considerations |
|---|---|---|
| Organic Acid Technology (OAT) | 5-7 years/75,000-100,000 miles | Requires less frequent changes compared to silicate-based coolants. |
| Silicate-Based | 2-3 years/30,000-50,000 miles | More frequent changes are necessary due to less protection against corrosion. |
| Hybrid | 3-5 years/50,000-75,000 miles | Offers a balance between performance and frequency of changes. |
Note: These are general guidelines. Consult your vehicle’s owner’s manual for specific recommendations. Extreme conditions (e.g., harsh winters or frequent high-temperature driving) may necessitate more frequent changes.
Troubleshooting Common Cooling System Problems
Maintaining a healthy cooling system is crucial for your car’s longevity and performance. Ignoring cooling system issues can lead to significant engine damage and costly repairs. This section Artikels common problems, their causes, and diagnostic steps.Understanding the mechanics of your car’s cooling system, and recognizing potential problems, allows for timely intervention, preventing more extensive issues and costly repairs.
Identifying Cooling System Problems
Recognizing the symptoms of a malfunctioning cooling system is the first step in effective troubleshooting. Common signs of trouble include overheating, leaks, and low coolant levels. These indicators can manifest in various ways, depending on the underlying cause.
Overheating
Overheating is a serious cooling system issue. The engine’s temperature sensor detects excessive heat, often triggering warning lights on your dashboard. Several factors can cause overheating, including a faulty thermostat, a clogged radiator, a malfunctioning water pump, or a leak in the cooling system.
Leaks
Leaks in the cooling system are a frequent occurrence. These can manifest as puddles of coolant under the vehicle, often near the engine block or radiator. Leaks can result from various causes, such as worn hoses, damaged gaskets, or cracked components. Inspecting the area around the engine and radiator regularly is important for early detection.
Low Coolant Levels
Low coolant levels are a significant indicator of a potential cooling system problem. Regular monitoring of the coolant reservoir is vital. Low levels can be due to leaks, or from coolant evaporation. An insufficient coolant level reduces the system’s capacity to dissipate heat, potentially leading to overheating.
Diagnosing a Cooling System Problem
A systematic approach to diagnosing cooling system problems involves a combination of visual inspections and basic checks. Begin by checking for visible leaks, followed by inspecting the coolant reservoir level. If the coolant level is low, identify the source of the leak. Next, examine the radiator and hoses for any signs of damage or leaks. Lastly, if the car overheats, determine if the warning light is illuminated, and if so, evaluate the engine temperature.
Overheating Procedure
If your car overheats, immediate action is critical to prevent significant engine damage. Pull over to a safe location, turn off the engine, and allow the engine to cool down. Avoid trying to open the hood while the engine is hot. Once the engine has cooled, check the coolant reservoir level. If the level is low, add coolant.
If the problem persists, seek professional assistance.
Common Cooling System Problems
| Problem | Symptoms | Potential Causes |
|---|---|---|
| Overheating | Engine temperature gauge in the red zone, warning light illuminated, steam from the hood, decreased performance | Faulty thermostat, clogged radiator, malfunctioning water pump, air pockets in the system, low coolant levels |
| Leaks | Coolant puddles under the vehicle, wet spots on engine components, diminished coolant levels | Damaged hoses, cracked radiator, worn gaskets, loose connections, corrosion |
| Low Coolant | Coolant reservoir below the minimum mark, possible overheating | Leaks, evaporation, incorrect coolant mix |
Maintaining Specific Components: How To Efficiently Maintain Your Car’s Cooling System
Proper maintenance of specific cooling system components is crucial for optimal engine performance and longevity. Neglecting these parts can lead to overheating issues, costly repairs, and even engine damage. A well-maintained cooling system ensures consistent temperature regulation, maximizing engine efficiency and lifespan.
Radiator Maintenance
The radiator is the heart of the cooling system, acting as a heat exchanger. Regular maintenance of the radiator and its components is essential for efficient cooling. A clean radiator allows for maximum heat transfer, preventing overheating.
To inspect the radiator, first, visually examine it for any obvious signs of damage, such as dents, leaks, or cracks. Check the radiator fins for obstructions, such as leaves, debris, or bugs. A clogged radiator can impede airflow, hindering the cooling process. For a thorough cleaning, use a garden hose to flush out loose debris and then use a radiator cleaning solution to remove any stubborn buildup.
Water Pump Inspection and Replacement
The water pump circulates coolant throughout the cooling system. A failing water pump can lead to insufficient coolant flow, potentially resulting in overheating. A functioning water pump is essential for maintaining a stable engine temperature.
Inspecting the water pump involves checking for leaks around the pump housing and impeller. Listen for unusual noises during engine operation. A worn or damaged pump may produce grinding or whining sounds. If any issues are identified, replace the water pump promptly to avoid further damage to the cooling system.
Thermostat Function
The thermostat regulates the flow of coolant through the engine’s cooling system. A faulty thermostat can lead to inconsistent engine temperatures, potentially causing overheating or insufficient cooling.
A properly functioning thermostat opens and closes at the appropriate temperatures, ensuring efficient coolant circulation. This allows the engine to reach optimal operating temperature quickly and maintain it effectively. Regular inspection of the thermostat is crucial for maintaining efficient operation.
Hose Inspection
Cooling system hoses carry coolant between various components. Leaks or damage to the hoses can compromise the coolant flow, leading to overheating.
Regularly inspect the hoses for any signs of leaks, cracks, or bulges. A visual inspection, checking for any signs of swelling, and testing the pressure of the hoses are vital. If any damage is observed, replace the hoses immediately to prevent further coolant loss and potential engine damage. Consider replacing hoses in sets for better efficiency and consistency.
Preventive Maintenance Strategies
Source: cdn-ds.com
Proactive maintenance is crucial for preventing cooling system failures. Regular checks and prompt repairs can save you significant money and headaches down the road. Ignoring potential issues can lead to costly repairs, a compromised engine, and even complete system failure. A well-maintained cooling system ensures optimal engine performance, fuel efficiency, and longevity.
Regular Visual Inspections
Regular visual inspections are a vital part of preventative maintenance. These checks can identify potential problems before they escalate into major issues. Thorough visual inspections should be a part of your regular vehicle maintenance routine.
- Inspect the hoses for cracks, bulges, or signs of deterioration. Look for any leaks or unusual swelling, as these are clear indicators of potential issues. Even minor cracks can lead to significant cooling system problems over time. For example, a hairline crack in a hose can slowly leak coolant, causing the system to overheat.
- Examine the radiator cap for proper sealing. A faulty cap may not maintain the necessary pressure, resulting in reduced coolant effectiveness. Check for any signs of damage or deformation. A deformed radiator cap can prevent the system from reaching optimal pressure.
- Look for leaks around the water pump, thermostat housing, and other components. Identify any unusual moisture or coolant residue. Early detection of leaks prevents coolant loss and overheating.
- Inspect the fan belts for wear and tear. A worn or damaged fan belt can reduce airflow to the radiator, leading to overheating. Examine the belt for cracks, fraying, or loose areas. A visually obvious belt issue should be addressed promptly.
Monitoring Coolant Levels
Regularly checking coolant levels is essential for preventing overheating. Coolant loss can occur due to leaks, evaporation, or other factors. This proactive approach can prevent costly repairs later on.
- Check the coolant level in the expansion tank regularly. The coolant level should be within the designated range marked on the reservoir. Low coolant levels can quickly lead to overheating.
- When adding coolant, use the correct type specified in your vehicle’s owner’s manual. Using an incompatible coolant can damage the cooling system components and reduce its effectiveness. Different types of coolant have different chemical compositions.
- Always allow the engine to cool completely before checking the coolant level to avoid burns. Checking the coolant when the engine is hot can lead to dangerous exposure.
Importance of Quality Parts
Using high-quality parts during repairs is crucial for maintaining the cooling system’s integrity and efficiency. The use of substandard parts can lead to premature failure and costly repairs. Invest in quality parts to ensure longevity.
- Employ genuine or reputable aftermarket parts when replacing hoses, gaskets, or other components. Look for brands known for quality and reliability.
- Ensure that all components are properly installed and sealed. Improper installation can compromise the integrity of the system and increase the likelihood of future leaks or failures.
Advanced Cooling System Techniques
Maintaining a vehicle’s cooling system efficiently goes beyond routine checks. Advanced techniques offer deeper insights into system health and potential issues, enabling proactive maintenance and preventing costly repairs. These methods provide a more thorough assessment than basic inspections, allowing for early detection of problems.
Pressure Testing the Cooling System
Pressure testing is a crucial diagnostic tool for identifying leaks and pinpointing potential weaknesses within the cooling system. It involves pressurizing the system to a specific pressure and monitoring for any pressure loss. This process helps to detect minute leaks that might not be apparent during visual inspections.
The purpose of pressure testing is multifaceted. It allows mechanics to pinpoint the exact location of leaks, a significant advantage over relying solely on visual inspection. This targeted approach often leads to faster and more accurate repairs. Furthermore, pressure testing verifies the integrity of hoses, gaskets, and seals, preventing future failures and ensuring optimal cooling system performance.
Finally, it confirms the proper functioning of the system’s components, ensuring efficient heat transfer and preventing overheating.
Step-by-Step Pressure Testing Procedure
- Preparation: Ensure the cooling system is adequately drained and clean. Disconnect any ancillary components that might obstruct access. Use appropriate safety gear, including gloves and safety glasses.
- Equipment Preparation: Gather the necessary tools, including a pressure tester, appropriate pressure gauge, and a pressure source (like a compressed air tank). Confirm the pressure tester is compatible with the vehicle’s cooling system.
- System Connection: Connect the pressure tester to the cooling system’s pressure ports. Refer to the vehicle’s repair manual for specific port locations and procedures. A technician should carefully inspect connections to ensure there are no leaks.
- Pressurization: Slowly pressurize the system to the manufacturer’s recommended pressure. Continuously monitor the pressure gauge throughout the process. Any sudden or rapid pressure drops indicate a leak.
- Leak Detection: With the system pressurized, carefully inspect all components for leaks. Look for signs of moisture, such as dampness or wetness, around hoses, joints, and gaskets. Pay close attention to the area surrounding the pressure ports.
- Pressure Maintenance: Maintain the pressure for a set period, typically specified in the repair manual, to ensure accuracy. Continuously monitor the pressure. Any sustained or increasing pressure loss suggests a leak that needs immediate attention.
- System Relief: Once the pressure test is complete, release the pressure slowly and safely, following the manufacturer’s guidelines. Disconnect the pressure tester.
- Leak Repair: Repair any detected leaks promptly. If the leak is severe, consider replacing components.
Specialized Tools for Cooling System Maintenance
Specialized tools are essential for effective cooling system maintenance. These tools aid in accurate pressure readings, leak detection, and system component checks.
- Pressure testers: These devices measure and maintain pressure within the cooling system, facilitating leak detection. Different types are available for various vehicle applications, so proper selection is crucial.
- Leak detection tools: These tools aid in identifying leaks by detecting pressure loss or the presence of coolant. This might include dye tracing or other specialized equipment.
- Torque wrenches: Ensure fasteners are tightened to the correct torque specifications, preventing potential leaks or damage. Precise torque ensures proper system operation.
Significance of Flushing the Cooling System
Flushing the cooling system is a critical aspect of maintaining system health. It removes accumulated contaminants, including corrosion products, debris, and old coolant, that can compromise system efficiency and lead to overheating issues.
- Improved Cooling Efficiency: Removing contaminants ensures the coolant flows freely, enhancing heat transfer and maintaining optimal temperatures. A clean system operates more efficiently, preventing overheating and reducing wear and tear on components.
- Prolonged System Life: Regular flushing prevents the buildup of corrosive materials that can damage components like the radiator, water pump, and engine block. By eliminating these corrosive substances, the lifespan of the cooling system is extended significantly.
- Preventing System Failure: Contaminated coolant can cause issues like clogs, decreased heat transfer, and eventual system failure. A well-maintained cooling system with proper flushing is less prone to these problems.
Environmental Considerations

Source: oakvilleautomotive.com
Protecting the environment is crucial when maintaining your car’s cooling system. Improper disposal of coolant can have significant negative consequences, affecting local ecosystems and potentially contributing to larger environmental issues. Understanding the environmental impact and proper disposal methods is vital for responsible car ownership.Proper coolant disposal is essential to prevent environmental contamination. Coolants, while vital for vehicle operation, often contain harmful chemicals that can cause severe damage to the environment if not disposed of correctly.
This includes harming aquatic life and impacting soil quality.
Environmental Impact of Coolant Disposal
Coolant, if improperly disposed of, can contaminate water sources and harm aquatic life. The chemicals in coolant can disrupt the delicate balance of ecosystems and cause harm to plants and animals. This includes leaching heavy metals and other toxins into the soil and groundwater, leading to long-term environmental damage. Furthermore, improperly handled coolant can pose health risks to humans involved in the disposal process.
Proper Disposal Methods for Used Coolant
Proper coolant disposal is vital for protecting the environment. Never pour used coolant down drains, into storm sewers, or onto the ground. These actions contaminate water sources and soil, leading to long-term environmental damage. Instead, take used coolant to an auto parts store, recycling center, or a designated disposal facility. These facilities have the appropriate procedures for safely and effectively handling used coolant, ensuring it does not harm the environment.
Importance of Recycling Coolant
Recycling coolant is crucial for reducing environmental contamination. Coolant recycling programs collect and process used coolant, extracting valuable materials and preventing harmful chemicals from entering the environment. These programs help conserve natural resources and reduce the demand for new coolant production, thereby minimizing the overall environmental footprint. This also reduces the amount of hazardous waste that needs to be disposed of.
Coolant Recycling Programs
Many auto parts stores and recycling centers have coolant recycling programs. These programs provide a convenient way to dispose of used coolant safely and responsibly. Participating in these programs is often straightforward, with stores or centers offering dedicated drop-off points or collection services. Check with your local auto parts stores or environmental services to find the closest program.
Disposing of Coolant Properly Without Harm
Always follow the instructions provided by your local recycling center or disposal facility. Do not mix coolant with other liquids, and always handle coolant with care. Use appropriate safety equipment like gloves and eye protection to avoid exposure to harmful chemicals. Ensure proper labeling and documentation to help with safe handling and disposal. These measures will prevent accidental spills and ensure the safe handling and disposal of coolant.
Tools and Equipment Needed
Maintaining a car’s cooling system effectively requires the right tools and equipment. Proper selection and use of these tools ensures accurate diagnosis, efficient repairs, and importantly, personal safety. This section details essential tools, their applications, and safety considerations.
Essential Tools for Cooling System Maintenance
A comprehensive toolkit for cooling system maintenance includes various tools, each with a specific purpose. Careful selection ensures accuracy and efficiency in every step of the process.
| Tool | Purpose | Relevance |
|---|---|---|
| Coolant Recovery Tool | Safely extracts old coolant from the system. | Essential for changing coolant and preventing environmental contamination. |
| Coolant Pressure Tester | Measures the pressure within the cooling system. | Identifies leaks, blockages, and other pressure-related issues. |
| Torque Wrench | Tightens fasteners with precise torque. | Prevents over-tightening or loosening of critical components, ensuring longevity and preventing leaks. |
| Socket Set | Provides various socket sizes for loosening and tightening bolts. | Essential for accessing and working on different components of the cooling system. |
| Pliers (needle-nose, slip-joint) | Used for gripping and manipulating small parts. | Needed for handling hoses, clamps, and other small components. |
| Screwdrivers (flathead, Phillips) | Used for removing and installing screws. | Essential for accessing and working on various parts of the cooling system. |
| Thermometer | Measures the temperature of coolant or engine. | Diagnoses overheating issues and monitors operating temperature. |
| Funnel | Facilitates pouring coolant into the system. | Ensures accurate coolant volume and prevents spills. |
| Drain Pan | Collects drained coolant and other fluids. | Crucial for containing fluids during maintenance procedures. |
| Gloves | Protects hands from chemical exposure. | Essential safety precaution when handling coolant or other fluids. |
Using a Coolant Recovery Tool
A coolant recovery tool is designed to safely remove old coolant from the cooling system. This prevents environmental contamination and ensures that the system is properly flushed. The specific process depends on the make and model of the vehicle, but generally involves connecting the tool to the vehicle’s coolant reservoir and activating the recovery mechanism.
Properly dispose of the recovered coolant according to local regulations.
Importance of Safety Equipment
Safety equipment is crucial for protecting against potential hazards during cooling system maintenance. This includes wearing safety glasses, gloves, and protective clothing. Coolant and other fluids can be harmful if ingested or inhaled, and appropriate protective measures should always be followed.
Using the Correct Tools
Using the correct tools for each job is critical for efficiency and safety. Incorrect tools can damage components, leading to costly repairs. For instance, using a regular wrench to tighten a specific coolant hose fitting can strip the threads, requiring more extensive repairs. Understanding the specific needs of each task is vital.